|
|
There were literally thousands of timbers and planks to deal with: joists, sills, posts, studs, rafters, braces, headers, jambs, all heavy and needing to be sawn and set in place quickly so that sheathing, siding, sub-flooring, flooring, decking and trim could go down.

On day one I learned about positioning the “crown up” for horizontal pieces and the practice of sighting along an edge became instilled. Time would reveal over a period of a few years just how much some timbers would move once they began to dry.

The next choice was to work around knots so that they would not fall in joint areas or right at the end of boards.
One thing I wasn’t aware of was powder post beetles.

Not long after we moved into the house we heard mysterious chewing noises and began to notice powder on the floor in places, invariably under timbers that had sections of bark along waney edges where the beetles lay their eggs. This problem lasted a couple of years until the moisture content in the green wood dropped. We were lucky in that their destructive action was limited and that there were no successive generations. Today I make sure to remove any strips of bark from green timber.
The season progressed:


My brother-in-law Paul Vanas spent his week of summer vacation building a door to the basement and setting up my first table saw.

The closing in process reminded me that fall would soon be ushering in cold winds, the windows,

woodstove, and insulation products would keep us warm, the electric wires provide us light, the copper pipes bring us water: a wonderful shelter was being created.


Dave and I had embarked on an ambitious plan, just two guys starting the construction of a house in May and being done by the first of October so that Courtney and I could move in. It was a great summer. We got her done.


How many products have you seen that devote a line to explain pronunciation?

These photos were provided by someone inquiring whether I had information about this electrically-powered device which was manufactured @1930 by my grandfather’s and great uncle’s company mentioned in this post a year ago. If anyone does, please pipe up. No company product information is available to me.
I can tell you that the family name is more often than not pronounced differently than the label demands, Voit being the most common. There have been some extreme interpretations. In summer camp I once missed my call to perform at a diving competition when the announcer called my turn: “Tick Vog (as in fog)-Tee”. Who the hell was that?
If you really want to get down to it, the label still gets the pronunciation wrong. In German the hard v sound doesn’t exist, so: Phote.
As for the object made by VOGT, is it pronounced like “how” with a following “er”? I hear it, the PHOTE-MAUER.
You need a reference face, a reference edge, and an understanding of how to work around the lack of ideal straightness and flatness. Rough sawn stock in the cabinet and furniture shop gets worked with machinery and/or bench planes and made accurately four square, generally. When I choose to build larger structures with rough sawn material, as in my current project, the joints are accomplished using hand tools. If you use a circular saw to cut the joints, its baseplate will be riding against an irregular surface. The same holds true for a compound miter saw. The saw cuts are straight but the angles can be thrown off.
Marking out with a good square (or Big Al’s Layout Tool) and knife, and sawing my way round a timber gets a very cleanly and squarely cut end to a post or beam.


Sawing the shoulder of a joint and then busting out the waste with a chisel


and paring to the line yields a very fine surface and one that hasn’t been messed up by an errant or burned sawcut from a blade that has twisted or rocked.

The 6” x 6” posts are from cedar that was sawn for me fourteen years ago. They have laid out in the elements the whole time- rain, snow, ice, and sun. Cut into them and they show not one bit of decay or degradation. The only “defects” are the drying checks.
This is a flee market chisel.

It has two owners’ sets of initials. The most recent user before me laid into it pretty hard with a steel hammer, I surmise from the mashed end. I’ll continue the progress until it completely fails, then make a new handle.

The forty-five degree ends of the braces were sawn close to the knife line and then planed.

There is a lot of checking with the square. The tightness of the joints equals what I can get from carefully prepared milled stock.

It’s all in the marking out, sawing, and paring.


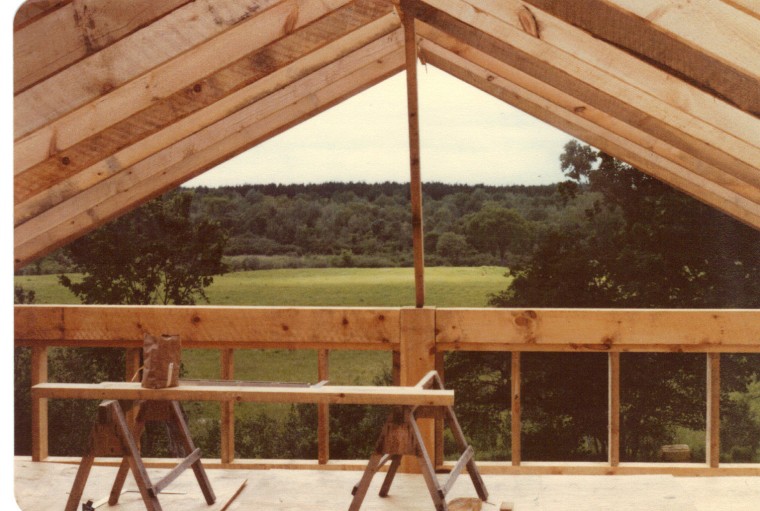
April and its cool wet weather gave way to a glorious warm and dry May. It was time to begin building on top of the recently laid block walls.
My wife and I hired Dave Bollinger to run the job.

I was to be his “gopher/slave.” He was only a couple of years older but had substantial background in construction. Together he and I completed the rest of the building, plumbing, and electrical work.
Our first construction task was to brace the basement walls in preparation for backfilling. It was a rough start. Though I had built a few introductory projects to get my feet wet, so to speak, I had not been in the position of having to cut a piece of wood to length at someone’s command. “97 and 7/8” Dave would call out. What he got, after several minutes of fumbling, was 79 and 7/16”. This went on throughout the entire morning. Even when the proper place on the tape measure was located there was the problem of the line. How big to mark it, leave it, remove it, try to split it… the green pine was coarsely textured, wet and soggy. The line itself, drawn from a dull carpenters pencil, was rather hefty, perhaps 1/16” thick itself.

Then again, there was the handling of the circular saw. All kinds of errors resulted from my untrained manipulation of it while pushing it through the 2 x material. Out of plumb, crooked, you name it, those were the kinds of cuts Dave was getting from this “green” sawyer. I’m sure he had serious doubts right about lunchtime that first day!
The little saw that could, can, and will.
Dave had recommended that I get a good quality saw, a Black and Decker with “Trade” marked on it.

This saw has been running steadily since 1980, never had its brushes replaced or any kind of maintenance done, been dropped and pushed for miles on end. Here it is on a recent project, ripping a beam.

It was not expensive and has worked like a champ. Honestly, by now it could very well have made a hundred thousand cuts and it’s not complaining one bit.
Up and away.

Having taken a good licking on the foundation bracing I was happy to rise above grade.

The building was simple timber framing with 2” x 6” studs 24” on center. There was an endless stream of pieces to saw to length, tenon shoulders and half lap notches.


And then, magic. Pieces of timber went vertical, there were walls and floor joists and a structure stood!


April was the month to complete work on excavation, well-drilling, digging trenches, and installing the utility pole, as described in the previous post. The masonry work on the basement (which would eventually be my woodshop) followed.
We hired mason John DeRidder, another honorable tradesmen.

The good ones take the time to educate you and explain what needs to happen. He did a great job for us on our simple project.

It was a wet and overcast month, but not too cold. I was itching to start working with wood and set out to build a few things in advance of the house carpentry that would begin in May. The very first thing I made was a tool chest for the site.

Tools used: tape measure, framing square, chainsaw, hammer, and hand drill. In this picture it is covered by a rain slicker. Notice the early flowering Shadbush, so named because their blossoms coincided with the schools of Shad that once ran during April in the Hudson River nearby.
Again, tools were a new phenomenon for me and there was everything to learn about them. The first lesson was about rust. It was a merciless taskmaster.

I had it from several sources that the wood to build with should be “green lumber” obtained from a local sawmill. The term “green” did not then carry the meaning of sustainability but, rather, freshly sawn and full of water. George Vincek was the local sawyer/farmer who supplied us with the house building timber. It had been sawn yesterday and felt like it.

The next project was a gate at the beginning of the driveway.

I reasoned that local urchins would avail themselves of tools and building materials stored on the site if they were anything like the kids my friends and I had been. It did occur to me that most of them didn’t drive and that there was nothing to stop them travelling overland. However, the green lumber was, by its sheer weight, not that easy to move very far, so such urchins would probably solicit the help of older siblings, the ones using our rural lane as a drag strip from time to time in their rusty four bangers.
The book “Build It Better Yourself”, mentioned in the introductory post, outlined the steps to build this gate. Tools used: framing square, tape measure, handsaw, hand brace, framing hammer, wrenches, pliers, post- hole digger, and shovel.

As the previous post described, we’d purchased land, decided on a house site, and begun a driveway. Then deep snow covered the ground for three months during which time we could hike around the property with our pooches and imagine building the house and living a rural life. It was a time to plan what kind of house could easily and affordably be built and learn what tools and materials would be needed.
The first tool was a book that had just come out: “30 Energy-Efficient Houses… You Can Build”.

One house plan that stood out for me was a simple salt box designed by Pat and Patsy Hennin of the Shelter Institute.
It seemed reasonably easy to modify and expand their open plan concept. A basement was added and the upstairs lofts made a bit larger, but the basic idea was to maximize the passive solar gain and have the long north sloping roof hunker down against the winter winds. This was my first experience ever drawing something that I intended to build; a trip to the art supply store for a small portable drafting board, graph paper, triangles, ruler, and Architects & Builders templates.

The general time frame was to excavate for the basement and have the masonry work completed by late April. There would be a fair amount of non-woodworking tasks, such as digging deep trenches from the well under the foundation,


installing a utility pole between an existing line and the site (perhaps the hardest physical task I have ever performed)

digging an artesian well for immediate water needs before electricity was hooked up,

garden preparation


raking and smoothing ground, digging post holes, and removing runs of barbed wire. It was lucky for us that a friend mentioned his grandmother was getting rid of a garage full of garden and lawn tools. They were the good wooden handled ones. There was also a very nice old fashioned store, Farmers Hardware, in Saratoga, where I could find just about any basic tool.

A list of basic homesteading type tools would include:
leaf rake, rigid-tined garden rake, tarp, pitchfork, wheel barrel and or Garden Way-style garden cart, spade, mattock, water hose, 5 gallon buckets, hatchet, hammer, regular screw driver, phillips head screw driver, chainsaw, bowsaw, crescent wrench, channel lock wrench, pitch fork, knife, wire cutters, hand drills and brace, posthole diggers, level, circular saw, pliers, crowbar, and tractor.


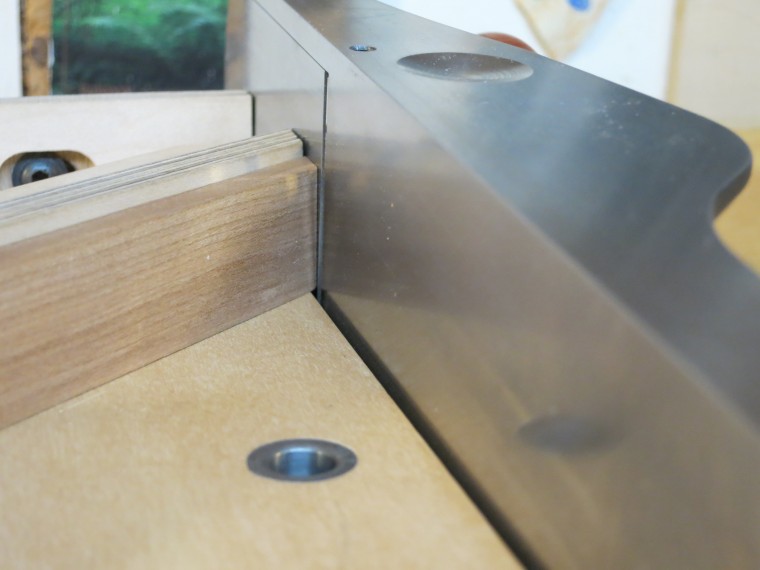
It is obvious that on wide pieces, like the sides of a jewelry box, where the width exceeds the capabilities of the miter fence to hold it steady, and/or the piece is wider than the plane iron is tall, the Donkey Ear will come into play.
Yet, those two criteria are not the only times where I would choose to use it.
Take a piece 3/8” thick and 1 1/8” wide, saw a bevel on the end, and consider refining the “carcase miter” on the shooting board.
Also, consider the vantage point of what the plane iron sees. With the workpiece against the Miter Fence, it sees 1 1/8” of blade involved.
Take even a fine shaving in that situation and you will feel the iron wanting to pull the piece along with it, much more so than on a thicker piece which offers more resistance. Thinner pieces are more liable to deflect under the pressure of the cutting action.
Place the piece on the Donkey Ear and the iron sees (at 45 degrees) ½” of material to plane.
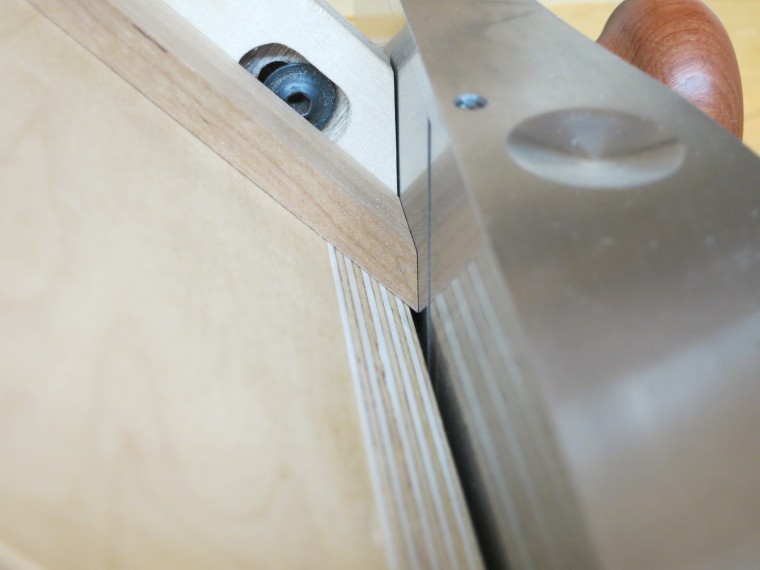
The width of 1 1/8” offers plenty of resistance and there is no tendency whatsoever to pull the piece along. It is pushing against it at ninety degrees. As long as you can back the fibers at the exit, you are good as gold. With molded pieces I sometimes use blue tape or a knife line to help support against blow out.


The sun slants in at a December angle, illuminating the cherry table top and the hand made coffee mug, its maker’s stamp highlighted. The appealingly designed logo G S is for master mudman Greg Seigel, recently departed friend from Kentucky.

My day begins sitting up in bed holding a warm cup that he fashioned, and proceeds to a breakfast of oat cereal held in a bowl turned on his wheel.

I’ll wash my hands using a bar of soap that sits atop his alligator tray.

At lunchtime his hand-friendly shaped small vessel is perfectly sized for yogurt.

The generous handle makes it easy for my wife to take a cup of tea with her on her evening walk.

Greg’s handwork has graced our days, year in and year out, for a long time.
My connection to him is through music. He played horn in different music groups with mutual friends in north central Kentucky and his home town of Cincinnati. He not only played a good sax but wrote some very fine tunes. One is the haunting “Mr. Moto.” Click here to hear an arrangement of it and performance on synthesized piano by Michael Ward.
His son Max is a NY based jazz musician (Wynton Marsalis, Mingus Big Band, Slide Hampton) and composer. Here they are, playing together.

His wife Rebekka is an outstanding art quilter, and daughter Nellie is an artist and works for the Artist Frame Service in Chicago. Getting to know Greg and his talented family has made me appreciate that, for rare individuals, art is a way of being.
Greg was also a funny guy. I shared some of his wit on this blog post. He commented.
I wash and dry the mug, and bowl, and cup. It’s different now. Should a careless move result in a crack or a break, there are no hands working the wheel anymore. I won’t be returning from trips to Kentucky with pottery wrapped inside my duffel bag.
Greg left more than just the stamp on his works. Like all artists, he changed the quality of peoples’ lives.

(Photo courtesy of Margaret Rhein)
Websites
Greg Seigel http://potbaker.com/
Rebekka Seigel http://quiltartz.us/
Max Seigel http://www.maxseigel.com/
It seems that woodworkers are a group of folks that generally revere the days of old. Remember this past August? Man, that was so yesterday that I feel I can talk about it with appropriate woodworking reverence.
I built a “sofa end table,” for want of a better term, smack dab in the midst of rainforest heat and humidity. If you’re going to fit a drawer with as little slop as possible, that would seem the logical time of year to do it. I’m curious to see if it will rattle around in February when every last bit of humidity has evaporated from our dwelling and the humidifiers will exhaust themselves in trying to keep our skin from cracking like dry leaves.

The quartersawn White Oak drawer material and the Cherry had been in my shop for more than two years. They knew the routine by then.
This method of fitting drawers I’ve gleaned from cabinetmakers in the UK and come up with my own method for preparing the carcase. The premise is that each component gets fit exactly to its corresponding space in the drawer pocket, which is not assumed to be perfectly square, and that the back will be a template, once exactly sized, for the front.

The first order of business, once the table was together, was to glue on, then screw, the runners. In this photo the table is upside down on a flat surface and ply spacers (Maple) determine their position fractionally above the plane of the lower front rail. That way the drawer sides will clear it and not rub.

Following that it was necessary to fill the space between the side panels and the leg posts, about 1/4″. This process of establishing parallel and straight interior walls is critical. The sides were not straight, to begin with, deflecting inward about three thou. Cross rails mid span between the drawer runners and between the kickers pushed the bow out adequately. A carefully shot “fit stick” told me, eventually, that the infilled sides were parallel top and bottom, front to back.

 3 thou bow  Fit stick 
 Checking straightness. One fine point of this method is to make the side to side dimension in the back about 1/32″ larger than the opening in the front. I did this after establishing parallel. What that means is that the drawer is easy to push home, but gets tight as you are about to open it all the way out. I’m sure this has saved many a drawer from careening to the floor.
Fitting the drawer members begins with making the back to fit the front opening snug and gap free on all edges. It is a time consuming process where the shooting board is indispensable. I made a template for each side, using paper shims on the fence until the angles were just right (and keeping track of the shims for the front). The pieces were pushed back into the opening to rest on the runners, which I mentioned before were a hair above the front lower rail.


Next, one template was marked off, knifed, onto an end of the drawer back, and, using the appropriate shim(s), shot to the line. The length of the piece was next taken and the opposite template laid alongside the line.
 Marking template onto back.  Marking for length. Here is my method to save time on the shooting board. After all, shooting quartersawn White Oak takes a toll on the cutting edge and there’s no point in trying to plane more material than needed. I set the workpiece against the miter gauge with the blade ready to cut to the knife line (the longer of the two distances if it is not square) and have the opposite end butted against a paper shim next to the stop block. Before cutting I remove the shim and shove the piece against the block. There will still be a substantial amount to plane and this is the most slow going part, to achieve a very tight and accurate fit left to right.

 Back well fit. Then the back is the template for the front and marked onto its inside face and the fitting process repeated. Much quicker this time around!

 Front fit tightly. The sides are shot to finished width and have no vertical play. They are fairly tight.

 Sides shot and fit. I prepared a sample side and front to get the hang of sawing the Oak and to practice dovetailing, which I enjoy doing but have little call for these days.


 Planing drawer slips.
 Marking rip line on back. Gluing up and final fitting.
The idea is that you know that the front and back fit the opening and the sides of the opening are parallel. This accounts for the method of marking for the thickness of the sides so that they are proud of the pins and once the drawer is glued and the glue cured, you have but to plane the sides front to back until you reach the end grain on the front and back pieces. At that point you should be ever so close to the right fit. Then it’s one shaving at a time.

The result is a really sweet working drawer. I took this table to a show at the International Yacht Restoration School and was asked by students who had never experienced that level of drawer action what kind of wax I used. Grease, lots of elbow grease.

Recommended reading and viewing.
David Charlesworth’s “Furniture-Making Techniques. Volume Two.” His article “Gliding Silently.”
Rob Porcaro’s article in Finewoodworking Magazine issue 224 “4 Steps to a Sweet-Fitting Drawer” plus his blog post “It’s August. Are your drawers up too high?”
David Savage DVD “Drawer Making, How to make ‘The piston fit drawer’”
Following up on the previous post about my dad’s work history, I have joined a blacksmithing and metalworking forum, www.iforgeiron.com, because of a link to the Henry Vogt Machine Company.

Check these pictures out.
On the forum is one member, a senior machinist, who has contributed a personal history of working for the HVMC in response to my questions. I think that his post is worth copying here, not for my family’s connection, but because of how it depicts a bygone way of developing company loyalty and dedication. Note: Henry Vogt was the founder and his son-in-law, G. A. Heuser, his successor.
“Henry Vogt himself was gone from the scene before any one I worked with started there. Mr G. A., as everyone referred to G. A. Heuser, was known as a good manager, fair but strict. Mr G. A. was Henry Heuser’s dad.
One guy told the story of a draftsman who worked at the board in front of his, and that fellow napped on the job pretty regular. Mr G. A. walked in one day and saw the guy asleep. The guy behind him asked ” Do you want me to wake him up?” and Mr G. A. replied ” No, he has a job as long as he is asleep”.
My working career started in 1981 at HVM and Mr Henry as we referred to Henry Vogt Heuser Sr. hired me. He was an astute manager, often saw talents in people that others did not, and fostered those talents. He was always a gentleman, treated everyone there in a gentlemanly way. He knew the names of the wives and children of everyone there! He would ask men working in the shops about the children, by name, and that fosters loyalty. He also had some interesting policies.
At VOGT, anyone working there could buy anything VOGT could for the same wholesale price. All of our venders either would sell direct, or a dummy PO for a cash will call was placed, a great benefit to folks building homes and the like. We could buy any scrap at the company for $0.06/#, $0.32/# for stainless. Even whole machines that were to be scrapped. Scrap wood was free.
If someone had a son that wanted to drop out of highschool, they went to Mr. Henry and the boy was hired, and usually was placed in the hottest, dirtiest nastiest job available. After a week or so Mr Henry would call the young man up front to the lunch room for lunch before anyone else was due to eat. He would ask the young man how he liked his job and then ask him if he knew what it took to eat up front and work in a nicer job, and, when the young fellow would ask what he would be told education! He would then usually be sent back to highschool, and if he graduated, he would often be given a scholarship for technical or college. Talk about building loyalty!
Speaking about the lunch room, In 1981 the lunch room fed everyone not in the Union. It was a take it or leave it plate lunch. It cost $1.00 per week! The women ate for $0.65/week! These were lunches like roast beef and mashed potatoes and gravy. There were a few lesser lunches like a hamburger or a chili dog but a super bennie.
At VOGT, when I started, no machine was bought until cash was in hand to pay for it. We had a tool committee, and when you had a machine or process improvement to propose that cost capital you went to the committee and you had to sell them (Mr Henry) on the value. Mr Henry remembered every machine in that plant, remembered what had been paid for it, when last overhauled, and when last moved, etc! Mr Henry once told me that when he had a hard decision to make he went out to the boiler shops and visited the worlds biggest riveter, which he had been involved in. Seems the riveter was installed and then VOGT switched to welding the drums, so it sat there unused. The first photo’s showing the tall machine in the book above are of that riveter. One of the 50 year veterans in the Engineering dept often said when we were walking back for the committee, “Mr Henry said, and we all agreed”
Being a blacksmith at heart and having grown up poor, I was a use it up, make it do, remake it into something useable kind of guy and Mr. Henry loved that. He hated throwing anything away if some value was to be had. We supplied every technical highschool program in the area with scrap plate for their welding courses, the totes would be weighed, sent out used for welding practice and returned for us to scrap. Oddly, they weighed more when they came back from all the weld metal, so it was a win- win for everybody:)
One of the Exec’s, Dan Schelgel lived in Breakinridge County and favored their local tech highschool, so they also got scrap machines to use.For many years I gave the technical and sales tours of the shops, and every year right before graduation the entire machinist class would come to VOGT for a field trip. I toured them through the shops, and then they were taken to a conference room and handed applications to fill out:)
Mr. Henry went to Purdue engineering, but adopted University of Louisville Speed School of Engineering. So, I had engineering co-ops in my R&D Labs, sometimes 3, and mostly from Speed School. Mr Henry took on getting a modern and new engineering lab built as the Speed School’s lab was pretty shabby then. When he retired as Chairman of the Board, he dropped way back in hours at VOGT to only 40 or so, and took on the new building as a personel crusade. He strong armed all the other industrialists and got it done, and that is a fine lab, fully equipped. They got the first TUBE ICE machine ever built as a test bed as well.
I was blessed to get the job at VOGT, as I was fresh from school in Mechanical Engineering, a Technology grad, and they never had one before. The Chief Engineer of the Valve and Fitting Division, Mr Perry wanted an engineering test lab, to leave as his legacy. He was due to retire in a few months and so interviewed me. Then he sold the idea to Mr Henry and I was asked back for another interview. What an interview! Every manager and chief engineer and superintendent tag team interviewed me! After a couple of hours an older gentleman came in and sat down and everyone else shut up. He introduced himself as Henry Heuser and began to ask questions. More like talking to an old friend than an interview. After a while he began to say “When you come work for me I have some projects I want to work on in my retirement and I think you will have fun with them”. I noticed a subtle change in the demeanor of the others. I was Hired:)
After it was over, the chief engineer told me he would write an offer letter that afternoon(Friday) and get it typed and sent out on Monday. Well, a week came and went, and then another week.. No letter. I figured they had changed their mind, and then I got a call at work in the R&D Lab at Westinghouse Airbrake fluid power division in Lexington KY. It was Mr Henry, and an instant thought flashed through my mind, “Mr Perry died, and there went my Job”. Mr Henry says “I am sorry to report that Mr Perry died that Friday night.” I thought OK now for the second part, and he said we have just now found the offer letter, are you still interested? I accepted and spent the next 17 years learning everything I could.
To show how they grew people, I was told, in the first month here take at least a couple of hours a day, and wander around and learn all you can. I sort of did that for 17 years:). In most corporations, a beginner with an associate degree would have been a tester, my first title for maybe 20 years. I learned and took on responsibility, and they allowed me all the new responsibility I wanted:) Soon I was a Test and Development engineer, and then a Test and Development and Special Project Engineer, then a Special Projects Manager. I also ended up with the Powerhouse for 18 months in there. Most companies felt paper on the wall was required, but Mr Henry often stated that 2-3 years working in industry was worth a year of college. And he followed through on that.
I was blessed to work at a company that allowed me to work and learn in every division, learning all the processes. HVM had a Heavy Equipment Division that made boilers, the TUBE ICE Division that made ice making equipment, a Food Equipment division, the Forge and Die division and Valve and Fitting Division. About 1700 employees when I started.
If you can think of an industrial metal working process, they had it (and several you did not know existed). As a self proclaimed techno-freak I was really a kid in the world’s best playground. And I got paid to go there 5 days a week:)”.
|
|

